How to Get a Low Car on Ramps Without Scraping the Bumper

To get a low car onto ramps without scraping, measure its lowest front point and assess clearance against the ramp’s approach angle. Choose low-profile ramps when clearance is tight. Check cold tire pressures, then clear the floor.
Align ramps beneath tire paths, ensuring bases sit flat and don’t rock. If entry remains abrupt, add tapered plywood extensions.
Creep forward steadily; stop if you hear scraping or see shifting. Chock grounded wheels, and inspect ramps further for safer lifting.
Bumper Clearance Check
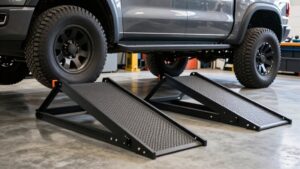
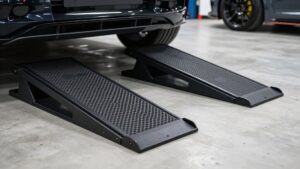
Before driving up, measure the lowest point on your car, such as the splitter, front lip, or oil pan, and compare it with the ramp’s peak height, usually about 2.5–3.5 inches for low-profile ramps. Use the ramp’s approach angle as your main clearance predictor; low-profile designs often sit around 7–10°, while standard ramps at 15–20° are more likely to scrape a lowered nose.
Check that the channels align under both front wheels, allowing the bumper to clear the driveway edge as the underbody rises smoothly. Set ramps on a flat, solid, non-slip surface; poor traction or hesitation can drag the nose and cause a sudden scrape. If possible, visually check the front lip’s path at the ramp start; stop now if contact seems likely.
Check Tire Pressure Before Approach
Check tire pressure before approaching the ramps; properly inflated tires keep their sidewalls firm and prevent the car from squatting more than expected on initial contact. Check each tire while cold, before driving, then set it to the vehicle maker’s specification. Low pressure adds deflection, reducing clearance near the ramp’s steepest point. Even low-profile ramps, often 2.5–3.5 inches high, may leave too little room.
- Match pressure across both sides so the chassis stays level as wheels climb the channels.
- Unequal inflation can pitch the drivetrain and lower one corner.
- Recheck after hot-weather or long downhill driving; heat can raise PSI and alter compression.
- Don’t compensate by guessing; use the placard or owner’s manual.
Confirm readings before positioning the car for a straight, controlled approach.
Step 1: Clear Garage Floor Debris
With tire pressure set, clear the floor so the ramps sit flat and the wheels track straight. Sweep and vacuum grit, sand, and gravel from the area. Loose material can lift a ramp lip or catch beneath its base, nudging your car forward toward the bumper. Remove raised debris, such as mud clumps or concrete nibs; even a small bump can steepen the approach angle for a lowered car.
Check that each ramp base rests flat on clean concrete or asphalt. Press it briefly and confirm it doesn’t rock before driving. Clean oil, grease, and water film with degreaser, then rinse and let the surface dry. Slick residue reduces tread traction, risking wheel slip; clear channels help your tires track without wandering, preserving your clearance margin.
Step 2: Align the Ramp Pair
Once the floor is clear, set the ramps on solid, level ground with their channels spaced to match your car’s wheel track. Center each ramp beneath its tire path so the tread lands fully inside the channel, not near an edge. Position the ramp fronts directly under the tires before you move; this reduces the chance that a low lip or splitter will catch at initial contact. Use the molded channels to establish a straight line, and keep the steering wheel centered until both tires are climbing.
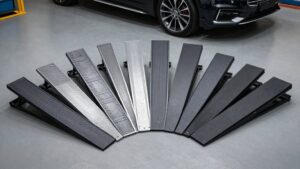
If you have long, shallow-angle ramps, align carefully and approach slowly; a 7–10-degree incline can help the nose clear smoothly, but doesn’t remove the need for caution. For modular ramps, check that left and right sections sit level and parallel. Recheck spacing and stability before driving onto them. Confirm each ramp cannot shift under tire load before your approach.
Step 3: Add Tapered Plywood Extensions
If the aligned ramps still present a sharp entry, add tapered plywood extensions to create a gradual approach angle of about 7–10 degrees. Measure the clearance gap, then shape each extension to rise only the few inches your lowered car needs; avoid a curb-like step. Extend the taper far enough to make the ground-to-ramp passage smooth, so your front lip or splitter clears before the wheel reaches the ramp peak.
Coat the plywood or secure grip tape across its surface to reduce tire slip. Set it flat and support its edges with blocks; check for movement or flex before loading, since a changing incline can bring the bumper into contact. Keep both extensions aligned with the ramps, and use sound plywood without cracks or loose layers. Don’t rely on unsupported boards or place your hands beneath a loaded extension. Verify each board carries the tire path evenly.
Step 4: Creep Forward at Idle
Creep up the ramps at idle with smooth, steady throttle, keeping the car centered in the channels and moving continuously. Hold a controlled crawl so each tire maintains grip on the ramp’s textured surface. Avoid sudden throttle inputs or braking; a pause midway can shift weight and increase the risk of the front lip contacting a steep change in level.
Let the tires climb without a load spike, and keep your path straight. If you feel resistance or hear scraping, stop immediately. Don’t add throttle to force the car forward; back off safely and realign before continuing. Maintain the idle crawl until the bumper and underbody aero peak clear the ramp’s highest point, typically about 2.5–3.5 inches on low-profile ramps. Then proceed to the next stage.
Step 5: Spotter Watches Bumper Clearance
Have a spotter watch the front bumper and splitter from the side as the wheels climb, focusing on the shift onto the ramp’s main section, where the nose is most likely to make contact.
Keep the car crawling with smooth throttle; avoid surges. Ask your spotter to confirm each tire stays centered in its ramp channel; misalignment can shift the car and reduce clearance. Have them judge whether the approach angle, ideally about 7–10 degrees, clears the lowest front point. They’ll call stop immediately at first contact: even a brief scrape can damage a vulnerable lip or splitter, especially near ramp peaks of 2.5–3.5 inches.
Keep watching until the car sits high enough to remain fully stable on top.
Step 6: Apply Wheel Chocks Afterward
Once the car is fully seated, check that the ramps’ non-slip surfaces are dry and gripping, then place at least two chocks against the tires on the grounded axle. If you’re working at the front, chock both rear wheels; if you’re at the rear, chock both front wheels. Press each chock snugly against the tire tread and lock it according to its design so it can’t slide.
Low-profile ramps may shift slightly on dusty or debris-covered floors, so don’t rely on ramp friction alone. Secure the grounded axle before you go underneath for an oil change or inspection. If a tire moves or a chock slips, stop and reset the setup from a safe position; don’t reach beneath the vehicle to adjust it carefully.
Check Tire Contact Patches
Before driving up, check that the center of each tire’s tread will meet the middle of its ramp channel.
Keep both front tires centered on the channels, using the ramp’s non-slip surface to limit wandering. A small offset can shift the contact patch and make the approach effectively steeper, letting a bumper lip or splitter catch an edge. If your car sits low, choose ramps with an extended approach angle of about 7–10 degrees.
With two-piece or modular ramps, verify that both front tires will land fully on their separate channels; one tire climbing early can change the car’s pitch and reduce clearance. Perform a slow roll test without throttle. Watch each tire engage and confirm its tread stays flat and centered before continuing up.
Ramp Base Slippage Fixes
Prevent ramp creep by placing each ramp on a flat, solid surface and using its non-slip base and rubber stop pads. Keep bases clean and dry; choose high-grip textures if traction seems uncertain. Align each tire in its channel, then climb slowly with smooth throttle; abrupt inputs can shove shallow-approach ramps backward.
| Risk | Correction | Verify |
|---|---|---|
| Slippery floor | Use rubber pads | Base stays put |
| Uneven sections | Seat split ramps evenly | No twisting |
For wider or lowered cars, seat split ramp sections evenly; misplacement can twist and pry them free near peak height.
Match each ramp’s rating to at least 1.5 times your vehicle’s weight; typical ratings run 6,000–12,000 pounds. Never drive up until both ramps stay planted. Stop if a base shifts; reposition before proceeding safely.
Check Ramp Surface Cracks
Even with both ramp bases planted, inspect the drive surface for hairline cracks, especially along the center channel and top lip. Small splits can widen under loads of 6,000–12,000 pounds, so don’t assume a ramp is safe because damage looks minor. Examine rubber or non-slip strips and textured grip areas; trapped debris or uneven wear can concentrate stress and trigger failure.
On polymer or composite ramps, check for delamination or separating seams, particularly on lightweight models often weighing under 20 pounds per pair. Confirm the surface stays continuous, without raised edges or chipped corners that could alter approach angle or traction. Replace cracked ramps; don’t patch them. A tire can catch and jolt the car, increasing the risk of bumper scraping during the climb.
Conclusion
Before you drive up, verify bumper clearance, tire pressure, clean contact patches, and a debris-free floor. Align both ramps squarely, then use securely fastened tapered plywood extensions if the approach angle is too steep.
Check for cracks and fix any ramp-base slippage before loading. Move slowly, stop if a tire shifts or the bumper nears the ramp, and chock the wheels once parked. Never crawl underneath until the vehicle is securely supported on rated stands.