Floor Jack Tonnage Chart by Vehicle Weight (With a Safety Margin)

Use a floor jack rated for at least 75% of your vehicle’s GVWR, found on the driver-door label or in the manual—not its curb weight.
Convert pounds to tons by dividing by 2,000, then round up: a 3-ton jack is rated for 6,000 pounds.
A 6,000-pound GVWR calls for a 4,500-pound (2.25-ton) jack, so choose 3 tons.
Check lift height, axle loads, and stand placement before working underneath; more practical checks follow.
Three-Quarter Capacity Rule
Although a floor jack doesn’t lift the whole vehicle at once, the three-quarter rule recommends a rating of at least 75% of the vehicle’s GVWR.
Find GVWR in the driver-side door jamb or owner’s manual; use it, not curb weight. The rule gives you a buffer because lifting loads the jack dynamically. Operating near its maximum rating can strain hydraulic seals, linkages, and pivot points and raise failure risk.
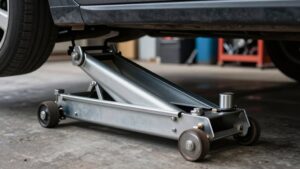
Don’t treat rating alone as proof the jack suits your job for the specific repair. Confirm it reaches the height needed to place stands at approved support points. Position the jack on firm, level ground and follow its instructions. Use the jack only to raise the vehicle; once raised, let properly placed stands support it before you work underneath.
Vehicle Weight-to-Jack Tonnage
To match vehicle weight to jack tonnage, use the GVWR on the driver-side door jamb or in the owner’s manual, then choose a jack rated for at least 75% of that figure.
Use 0.75 × GVWR as your minimum, then review the load your saddle will actually carry. A typical end lift places about half the vehicle’s weight on the jack, but the rating must exceed that applied load.
| GVWR | Minimum jack rating |
|---|---|
| 3,000 lb | 2,250 lb |
| 4,600 lb | 3,450 lb |
| 6,000 lb | 4,500 lb |
| 8,000 lb | 6,000 lb |
If your minimum sits near a class boundary, move up; a 3-ton jack covers 6,000 lb. Confirm usable lift height reaches your jack stands; capacity alone won’t guarantee safe support. Choose for the specific task.
Gross Vehicle Weight Ratings
Use your vehicle’s gross vehicle weight rating (GVWR), the maximum permitted weight of the vehicle, occupants, cargo, accessories, and fluids, to estimate the minimum floor-jack capacity you need. Find GVWR on the driver-side door-jamb label or in your owner’s manual; use that figure when choosing lifting and support equipment.
With the 3/4 rule, multiply GVWR in pounds by 0.75 to estimate the minimum jack capacity. GVWR isn’t curb weight: curb weight includes standard fluids but excludes passengers and cargo. Using curb weight could leave your equipment underrated.
Because GVWR is a worst-case legal maximum, avoid gear at its rating limit. If your calculation nears a jack or stand capacity boundary, round up. This helps keep loads below equipment limits and preserves a safety margin.
Axle Load Distribution
Your vehicle’s weight isn’t split evenly: a front-heavy 4,600-lb vehicle with a 60/40 split puts about 2,760 lb on the front axle. Side-to-side imbalance and weight shifts during lifting can make a corner’s load differ from a simple estimate, especially at the rear.
Use measured axle loads when possible, and choose a jack rated for the heaviest load you’ll lift.
Understanding Axle Weight
Because vehicle weight isn’t evenly distributed, a floor jack may support more at one corner than you’d expect from the vehicle’s total weight. A vehicle’s curb weight or GVWR won’t tell you exactly what a jack must lift at one point. Weight also varies side to side, so a single-corner lift doesn’t necessarily carry half the vehicle’s weight.
Use axle weight as a better starting point: weigh each axle separately at a truck stop, then estimate the corner’s share rather than relying on total weight. Even if the jack’s rating exceeds an axle’s weight, a heavily loaded corner may still make lifting harder. Check capacity, lift on approved points, and use jack stands before working under the vehicle. Never rely on the jack alone.
Front-to-Rear Distribution
Front-to-rear weight distribution affects how much load a jack must handle: many modern cars carry roughly 60% of their weight over the front axle and 40% over the rear. That bias means you shouldn’t size a jack by assuming each axle carries half the vehicle’s weight. When you lift an end, the jack’s saddle may take a substantial share of that axle’s load; front-mounted engine and transaxle layouts often make the front lifting points the heavier case.
For example, a 4,600-pound-GVWR vehicle with a 60/40 split places about 2,760 pounds on its front axle. Use the heavier axle’s applied load to check jack and stand capacity, while following the vehicle maker’s approved lifting points. Your total vehicle weight may look within a jack’s rating, yet the load at a particular lifting point can be higher than a simple half-weight estimate. Choose capacity for the worst-case end, with an appropriate safety margin before lifting.
Side-to-Side Imbalance
Even when axle weight seems manageable, side-to-side imbalance can put more than half the axle’s load on one corner. A low side, uneven suspension, or sloped ground can shift load toward one wheel, so don’t assume each corner carries an equal share.
Front and rear axles also carry different totals; many modern vehicles place about 60% of their weight at the front. When you lift one end, the jack supports load at its contact point, and the heavier corner may exceed what average axle figures suggest.
Choose a jack and stands with capacity above the minimum you expect to need. If you’re near a rating limit, weigh the front and rear axles separately, then treat the heavier-side corner on the heavier axle as the limiting case. Work on firm, level ground, and never exceed equipment ratings.
Estimating Axle Loads
Estimate axle loads from your vehicle’s GVWR—the maximum loaded weight listed on the driver-door label or in the owner’s manual. Cargo and passengers change distribution, so use GVWR as a planning reference. Many modern vehicles carry roughly 60% of their load on the front axle and 40% on the rear, not an even split in practice.
For a quick corner estimate when lifting one end, take the heavier axle’s estimated load and divide by two; the corner load is about half the axle load. For more accurate figures, weigh your vehicle at a truck stop that records front and rear axle weights separately. When sizing jack stands, use the heavier measured axle as your reference. Jack load depends on the section being lifted, not total vehicle weight.
Applying Axle Loads Safely
Once you’ve estimated axle loads, size the jack and stands for the load you’ll actually lift—not the vehicle’s total weight alone.
A common split places 60% of weight on the front and 40% on the rear. For a front axle, use 0.60 × GVWR as a case; for the rear, 0.40 × GVWR. But verify actual axle weights if possible, and size support for the heavier axle.
When lifting one corner, don’t assume half the vehicle’s weight. Estimate applied load from measured axle weight; for one side, divide that axle’s reading by two, then allow a safety margin. Suspension movement can change the load.
Center the jack and stands at the manufacturer’s jacking points. Keep your vehicle level on hard ground; poor placement raises tipping risk.
VIN-Based Curb Weight Lookup
Use your VIN to identify the exact model year and trim, then check the manufacturer’s build sheet for its curb weight; engine, drivetrain, and options can make two vehicles with the same model name weigh differently. Treat that VIN-based figure as your standard-equipment baseline; you’ll still need a safety margin when selecting jack tonnage.
If the lookup doesn’t return curb weight, consult the owner’s manual or door-jamb information, since configurations can make VIN data differ. Verify the number against a second source, such as another VIN database. Don’t mistake GVWR for curb weight: it’s the maximum loaded vehicle weight, so use it only as a cross-check. Discrepancies can affect sizing calculations; you may need to step up from a 3-ton to a 6-ton jack-stand choice.
Low-Clearance Lift-Point Checks
Before lifting a low-clearance vehicle, measure from the ground to the specified lift point and confirm your floor jack’s minimum and maximum heights cover that range, with enough room to fit jack stands. Check the underside at that exact location for skid plates, exhaust, steering components, or other obstacles; the saddle mustn’t contact thin plastic or parts that can deform. Use your manual’s specified pinch-weld notch or rail, and center the jack on level, stable pavement to reduce sideways slip.
Before pumping, verify the saddle pad fully contacts the metal lift area, not merely its edge. After lifting, verify stands fit fully under correct support points without exceeding the jack’s height limit; if they don’t, lower the vehicle and reassess setup before trying again.
Loaded Bed Weight Effects
A loaded bed can shift more weight onto the rear axle, increasing the load on the jack point even though the jack’s rating stays the same.
When you size a floor jack for a pickup with cargo aboard, use its GVWR, not curb weight, as your baseline. Estimate the end load you may lift at one time, often about 40–60% of total weight, depending on balance; then round up so the jack won’t work at its limit. A heavier bed can demand more handle effort, slow the lift, or trigger an overload/bypass that stops further lifting.
Before you work beneath the truck, support it with properly rated jack stands; check their paired capacity for the increased corner load. The floor jack is for lifting only.
Uneven Garage Floors
Uneven garage floors can make jack stands rock or tip, even when their rated capacity is adequate. Tonnage alone won’t keep a vehicle stable: a tilted base can multiply the load on a stand and reduce its tipping margin. Before lifting, test each stand’s spot without the car, and reject any wobble.
- Place stands on firm, level concrete; avoid soft patches, cracks, and sloped slabs at lift points.
- If the floor isn’t level, use a load-rated base plate or sized cribbing to create a flat, stable support.
- Give both stands full, uniform contact; don’t let a leg rest on a gap or ridge. Recheck stability after lift and before you work; settling can change the stance. Set the parking brake and chock grounded wheels.
Wheel Chock Placement
Even on level concrete, secure the wheels that stay on the ground so the vehicle can’t roll if the jack or stands shift.
Chock the tires that remain grounded, usually at the opposite end from your lift. Place each chock against the tire tread, never the sidewall, and block movement in both directions whenever possible. If you’re lifting the front, set the parking brake and chock both rear wheels. Don’t treat the brake as your primary restraint.
- Put chocks in front of and behind tire tread where you can.
- Seat each chock firmly on flat, nonslick ground.
- On a slope, chock both downhill wheels to resist rolling.
Recheck contact before lifting; chocks limit rolling but can’t stabilize soft ground. They don’t replace properly rated stands.
Conclusion
Before choosing a floor jack, check your vehicle’s curb weight, axle loads, lift points, and loaded-bed weight. Apply the three-quarter capacity rule as a minimum guide, then choose a jack with a suitable safety margin and enough clearance for your vehicle.
Don’t rely on GVWR alone, and verify weight by VIN when needed. Work on level, solid ground, chock the wheels that stay down, and support the vehicle with jack stands; never rely on a floor jack alone.